How To Make DIY Tool Inserts From Foam to Organize Your Collection
At the top of the list of the most aggravating household mysteries, along with missing socks and disappearing TV remotes, is how it seems whenever we need a particular tool, it’s always the only one missing from the drawer. Whether your ratchet is MIA, or the wrench you want is in hiding, it’s incredibly frustrating to waste 30 minutes looking for a tool you only need for 30 seconds of work.
Organization is what it always boils down to, but that’s something more easily recognized than changed. More often than not, things break in the middle of something else we’re already doing, so as soon as the problem is fixed, the tool gets tossed back into its drawer with a promise that we’ll put it back in its proper place when we have the time, which of course, is never. The solution is to create a special spot for each tool that allows you to quickly find it, while making putting it back easy enough that you’ll actually do it. The smartest, simplest and most cost-effective way to do this is by creating your own foam insert tool chest liners, a DIY project that will save you time and headaches each time a job pops up.
Tool case liners are made out of layered, custom-cut closed-cell foam that creates a unique spot for each tool in your collection. Not only do these liners organize stationary tool chests, they can prevent you from leaving behind tools you brought to a job site. These inserts are incredibly easy to make on your own, requiring only a tape measure, foam sheets, spray adhesive, a non-serrated knife, and a marker. Simply put, if you’re comfortable tracing, cutting, and gluing two pieces of foam together, you’re qualified to make your own toolbox liners.
The first step in making your own tool chest insert is figuring out how much material you’ll need. The craft foam sheets should snugly line the drawer on all sides, so carefully measure the interior dimensions of each drawer you want to organize. After calculating how much foam you will require, you need to decide what type of foam to use. Because of its moisture resistance and durability, only closed-cell foams should be used to make tool inserts. The Foam Factory stocks a variety of closed-cell foams that work well as tool case inserts, including cross-linked polyethylene, polyethylene roll, and standard polyethylene.
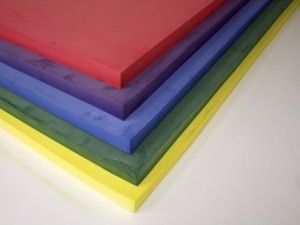
You will need two layers worth of foam; a white or brightly colored foam for the bottom pad layer, and a dark top layer which will hold the tools. The reason for the contrast is two-fold. A bright bottom layer makes it glaringly obvious when a tool is out of place, a sort of safety alarm preventing you from forgetting to put a tool back and losing it. A dark top layer is desirable because it will aesthetically wear better over time, with greasy or dirty tools being taken in and out. You can make the bottom layer as thick or as thin as you want, but for ideal security, the top cutout layer should be deeper than the tools it will hold. It isn’t absolutely necessary, but it helps keep tools from sliding out if there’s a lot of movement. Additionally, make sure the adhesive you purchase to bond the two sheets is appropriate for the type of foam you’ve selected.
Once you have your materials, trim your foam sheets to the length and width of the tool drawer they will be placed in. Be sure not to over-cut the foam, since the sheets need to fit snugly against the drawers’ sides to keep the insert in place. The easiest way to cut the foam is on a flat surface like a cutting board or workbench, using a straightedge and a utility knife for clean lines.
Once the sheets are trimmed to the size of the drawers, arrange the tools how you want them on the top sheet of foam. Once you complete your layout on the foam, carefully trace along the outer edge of each tool with a permanent marker. Don’t worry about any extra marks on the foam or sloppy tracing, as this side will eventually be glued face down and hidden.
Depending on the complexity of your layout and the size of the tools, a standard utility knife may not give you the cutting control you need. If this is the case, precision hobby knives are excellent for intricate shapes and clean cuts. When you’re ready to trim, it is vital that you cut INSIDE of the tracings you made. Cutting within the lines ensures the foam will “grip” the tool, holding it snugly in place. Depending on the thickness of the foam sheet or size of the tool, some people add finger slots to their cutouts to make removing a tool easier, but this is purely personal preference.
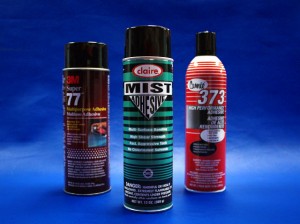
Once you’ve cut out the shapes and made sure the tools fit well, the next step is gluing the freshly cut top sheet to the colored base. Spray adhesive is necessary for an even, strong bond, but can be messier than non-aerosol glues. Because of this, your work surface should either be something you don’t mind getting dirty, or carefully covered with a drop cloth or newspapers. When your work surface is prepped, you will want to spray the cutout layer evenly, making sure that you’re putting the glue on the side with the tracing marks. It’s important that you only spray the cutout layer and not the base, since the cutout layer will leave sticky areas exposed where the tools will go.
After waiting a few seconds for the glue to get tacky, carefully lay the base layer on the top sheet. Apply firm pressure across the sheet for a few seconds, and allow a minute or two for the glue to bond and dry. With that done, you can add the insert to the drawer, and put your tools in their newly organized spots!
Creating your own drawer liner inserts will save you the time spent looking all over for what you need, as well as the frustration of looking high and low for the one missing tool. And if it keeps you from leaving behind a single tool, it will have paid for itself numerous times over.
Tags: Closed-Cell Foam, Cross Linked Polyethylene, Polyethylene, Spray Adhesvie, Tool Insert
Posted in DIY, Foam Packaging


Looking for foam replacement for storm case or pelican.. not sure what type of foam it is.. help would be much appreciated.. thanks
Commonly what is used is our charcoal regular foam. We also have pick and pluck foam as well.
I would like pricing for tool box foam
Please contact us directly for more information.
I very much like the concept of a more rubberized foam verses the common packing foam I see used for tool organization. I am putting together ‘mobile’ tool cases. They will contain multiple individual-palleted mini tool carry bags and I’m looking for an option that allows the tools to stay in place more securely in their cut-outs in an environment where the tool bag will certainly be tossed around.
what density do you recommend for common tools? 2lb or 4lb?
For this application, we recommend our 2lb Cross-Linked Polyethylenefoam.
I wish to make foam lined wood cases to hold hand blown glass dip pens and accessories. Which foam would you recommend?
We would recommend our Charcoal Regularfoam for your application.
I need to replace the foam insert for my hiking backpack. What kind of foam is recommended?
Please Contact Usfor recommendations for your application.
Would this foam be safe to use with a laser cutter? I have access to both a small CNC and laser cutter.
We would not recommend cutting any of our foams using a laser cutter. CNC or waterjet would be the recommended cutting solution. Please Contact Uswith any other questions on foam cutting applications.
I would like to make a foam insert for a vintage High Standard pistol. I have the original cardboard box but I need the form insert. Can I do this with your product? Please instruct me on which product to buy inorder to make the insert. Thanks
If you would like to custom cut the product yourself, you can do so with our Charcoal Regularfoam. To make it easier, we also offer our Pick and Pullfoam. If you are looking for someone to do the cuts for you, feel free to Contact Usfor further information.
Hi there, I’m looking for a foam to put into a wooden case to hold a collection of zippo lighters, what foam would you recommend for this application, they need to be secure when placed in the foam as there is a hinged lid to the box that will have foam to house said zippo lighters, thanks in advance. Keen to understand your cutting service as well please?
Please Contact Usfor more information regarding your inquiry.